While handstand talking isn’t exactly crucial to functional fitness, I understand the appeal. It’s a pretty cool party trick!
Here’s the thing, though. Unfortunately we can’t just “show you how to walk on your hands.” If takes time—a lot of time! If you’re OK with that and are willing to put in the time, here are some basics concepts, and things you can do, to get closer to walking on your hands.
1. Positioning
To balance on your hands, your lower body—your hips and feet—to be parallel with or over your shoulders (In a perfect gymnastics world, you wouldn’t be over rotated at all, but we’ll accept a bit of an arch in your spine to help you be more balanced).
Let’s look at the pictures below:

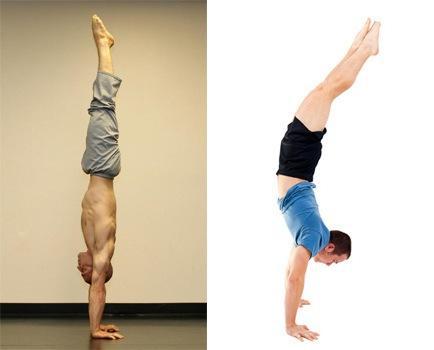 In the first picture, although her torso is straight, her head is pulled way back. Her hips and feet are behind her shoulders. This means gravity will immediately do its thing and pull her to the ground. It’s almost impossible to balance a handstand in this position.
The middle picture of obviously the most ideal position. His feet, hips and shoulders are stacked perfectly on top of one another, and his spine is in a safe and beautiful position. It’s IDEAL, but it’s not that realistic for most of us.
The third picture (right) is indeed an ugly handstand, but my guess is he’d beat the woman in the first picture in a handstand contest. He’s got a big arch in his back, but it’s much easier to stay balanced in this position, and much easier to walk on your hands, when your bodyweight is moving in the direction you’ll be walking as it is here.
This is why a lot of us default to this position when we are learning to walk on our hands.
2. Learn how to fall
It’s imperative that you know how to fall out of a handstand. If you don’t, you’re going to end up smacking your back, or your head, on the hard ground. Learning how to fall safely will also make you less scared to send your bodyweight over your center of gravity as you start to walk on your hands.
Two options include:
- Tucking your head and rolling: (although this can still hurt on hard ground). The best way to practice this when you’re first start is from the wall. Check out this video for a great demo:
- Cartwheel dismount: Although it sounds tricky, really all you have to do is turn your hips 45 degrees to the side as you’re falling, and then step down.
3. Freestanding Handstand
Again, in an ideal world, you would learn a freestanding handstand before you learned how to walk. If you can hold a handstand without walking, then walking is an absolute breeze!
One great drill to practice your freestanding handstand control and balance is to use a wall, but instead of kicking up with your back to the wall, cartwheel up (or wall walk up) so your chest is facing the wall. Once you find your balance, push off the wall and see how long you can balance for a couple inches from the wall. If you come back to the wall, reset a moment and then push back off the wall gently with your toes and try again. Here’s a video for clarification:
Keep practicing and ask us questions at the gym! Happy Handstanding 🙂
-JQ